When using a Campbell Scientific data logger to collect data from ShapeArrays (SAAs), it is necessary to use Campbell Scientific software to program the data logger and perform data collection. Campbell Scientific provides PC400 software for free for basic interactions with the data logger. You can acquire PC400 directly from Campbell Scientific's web site at the following URL:
https://www.campbellsci.ca/pc400
NOTE: The instructions below show screenshots from the PC200W software which has been replaced with PC400. The instructions apply equally to both PC200W and PC400. Campbell Scientific's LoggerNet can also be used for this purpose. If you are using LoggerNet please follow the guides located here.
Once you have downloaded and installed PC400 on your computer, take the following steps to prepare the data logger to work with Measurand ShapeArrays.
Step 1 - Start the EZSetup Wizard
From the PC400 window, click the Add Datalogger button to start the EZSetup Wizard.

Figure 1: PC400's main window - green arrow points to the Add Datalogger button
On the first page of the EZSetup Wizard, click the Next button.

Figure 2: The first page of the EZSetup Wizard
Step 2 - Begin Communication Setup
Select the appropriate Campbell Scientific data logger that will be used for this setup and enter a name for the data logger. It is recommended you choose a name that is memorable. Click the Next button to continue.

Figure 3: Selecting the data logger model and name
Step 3 - Continue Communication Setup - COM Port Selection
Campbell Scientific's PC400support direct connections to the data logger through a COM port on your computer. Select the Direct Connect option and click the Next button.
The next step in the EZSetup Wizard is then configuring your computer's COM ports for communication with the data logger. Select the computer's COM port from the COM Port dropdown list to which the data logger will be attached. The COM Port Communication Delay should be set to 0 seconds. Click the Next button to continue.

Figure 4: Selecting the COM Port and communication delay
Step 4 - Continue Communication Setup - Data Logger Settings
The settings on the Datalogger Settings page are unique to each setup. In most cases, the default settings are acceptable. Refer to the Settings Help button on the bottom left of the window or contact Measurand for further assistance if the default settings are not desirable. For Measurand communication devices like the SAA232 and SAA232-5, a high Baud Rate is acceptable. Click the Next button to continue.

Figure 5: Configuring data logger settings
Step 5 - Continue Communication Setup - Datalogger Settings - Security
This section of the wizard is only required if a security code was applied to the data logger itself. Click the Next button to continue.

Figure 6: Configuring data logger security is typically not required
Step 6 - Review the Communication Setup Summary
The Communication Setup Summary page in the wizard gives a synopsis of the data logger setup to this point. Click the Next button to test communication with the data logger.

Figure 7: Reviewing the communication configurations
To run a Communication Test, ensure the Yes option is selected and click the Next button to continue.

Figure 8: Click the Next button to test communication with the data logger
After the communication test is completed, click the Next button to continue.
Step 7 - Configure the Logger's Clock
On the Datalogger Clock page of the setup wizard, you can synchronize the clock on the data logger with the clock on your computer or apply an offset to the data logger's clock. Enter the desired offset in the Time Zone Offset field and click the Set Datalogger Clock button to change the clock on the logger to match your computer's clock plus or minus the configured offset. Once the clock has been set, click the Next button to continue.

Figure 9: Setting up the logger's clock
Step 8 - Send the Program to the Logger
On the Send Program page of the setup wizard, you can send the program file to the data logger. Before you can complete this step, you need to have a program file created with SAACR_FileGenerator as described in the SAACR_FileGenerator How-To Guide.

Figure 10: The Send Program page of the setup wizard
WARNING: Older versions of SAACR_FileGenerator created two files: a main program file and an SAA_Include file. If your version of SAACR_FileGenerator created two files, then Measurand highly recommends upgrading to the most recent version of the software. The latest version produces only a single program file that has many optimizations and bug fixes over programs created with earlier versions.

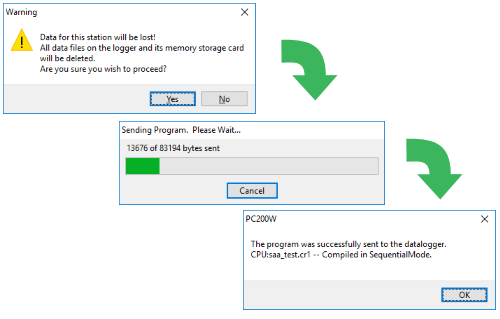
Figure 11: The various dialogs that will appear while you are sending the program to the logger
After the upload and compilation has completed successfully, click the Finish button to save the configuration and exit the wizard. Your data logger is now properly configured to record data from your ShapeArray.
